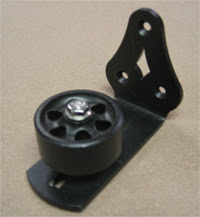
I went to http://www.barndoorhardware.com/ and spoke with them directly to ensure I was ordering the right hardware. The one thing we ordered that I would never had thought of (per the rep that I spoke to) was a stay roller to keep the door from swinging. The stay roller is fastened to the wall behind the door, the door sits between the wall and the roller. The roller can be adjusted for width of the door.
 |
| Source http://www.barndoorhardware.com/accessories/guide-rollers/ |
 |
| Source http://www.barndoorhardware.com/flat-track-hardware/ |
Because the door is arched we had to make some adjustments to the length of the strap. We had the guy that framed our home (Andy) cut and then weld a long piece in the middle to make the straps much longer. You would never be able to notice the adjustment he did such a great job!!
You can see here that the reason to make the strap longer was where the top of the door arched the original strap was too short for the long sides, and to have put it on the next panel would not have allowed for the door to hang right.
And then...
We hung the door to ensure everything was right with the hardware...
Oh snap....look how sweet she looks all hung up!
I began the work on the door... This was a process in itself.
.....between layers of paint and the bottom of the door had wood rot.
I started sanding...and sanding...more sanding. And, then I filled in the wood rot with Rot Stop first and then wood filler. I think I ended up sanding and filling with more wood filler 3 or 4 times. Since this was to be an inside door, I was not in the least concerned about the wood rot.
Once I had a good smooth surface and the majority of the paint removed (I never got to the original door, but I didn't need to) I had to decide what color I was going to paint the door. Now let me just tell you this... I love with all my heart old barns especially red ones. This door reminds me of just that and I so wanted to paint it red in the very beginning.
BUT...
.....I was nervous as all get out.
I have never stepped out of my comfort zone and gone BOLD. Red is a statement to me. But, then I remember reading a very long time ago that using red in decorating brings happiness.... love. A red door means "welcome" and "protection".
And...then I had to break the news to the man of the house. Well you see how it turned out :)
I had to put about 3 coats on each side. The color is Barn Door Red by Glidden.
I then used a little ebony stain and wiped around to make it look really old and distressed. I used baby oil to move the oil around and really concentrating on the crevices. I let it dry and cure for a day. I then waxed it with Maison Blanche antique dark wax.
Once completed I added the kick plate on both sides, the mailbox slot and the handles.
And...this is my final product -
That is my DIY before and after in creating a really beautiful piece that for me creates a focal point into our pantry. May our home welcome you (our guest) to come in and join us, and may you feel loved and happiness as you sit with us at the dinner table or kitchen island as we chat, sip our beverage of choice and eat yummy food!
Have a fantastic day and weekend!!
~Lynn


Oh wow! I thought the door was pretty awesome to begin with when I first starting reading your post. But, how sweet does it look when you're done!! I'm stopping over from the Blogovin' Blog Hop and will be your newest follower. :)
ReplyDeleteThank you Denise. I did love the door at first sight too :)
DeleteI have a HUGE crush on that door Lynn.
ReplyDeletehave a wonderful weekend.
Hugs, Gee
Me too Gee. I hope you had a fantastic weekend :)
DeleteWow Lynn - It looks amazing!!
ReplyDeleteCheryl @ The Creative Me and My McG
Thanks Cheryl!
DeleteWow! What a change! I love it! Lynn I found your link at the Bloglovin' Blog Hop. I'm a new follower via Bloglovin'. Please follow me back. :D
ReplyDeleteWell thank you. Coming over to visit your blog...
DeleteLOVE that!! What a perfect look!
ReplyDeleteThanks Anne...
DeleteWhat a lovely, lovely idea!!!!! I love the color! Awesome job!
ReplyDeleteblessings,
karianne
Thank you Karianne.
DeleteThat door is absolutely amazing ! Love it !
ReplyDeleteThanks Priscilla :)
Deleteoh my goodness, that is sooo cool!!!! what a great idea!!!! pinning now.
ReplyDeleteThanks for much for linking up to support Habitat! Good luck and hope to see you back next Thursday night. :)
Thank you Jocie. It was a fun project to do.
DeleteRed may be a bold statement but I'm glad you took the risk. I think it's a nice and interesting touch to the room. From the restoration work to the final reveal, all the hard work definitely paid off. Awesome job, Lynn! -Rolf Matchen @NVRoofs
ReplyDeleteThank you Rolf. We really love it and am happy I took the leap and went for it. Thanks for stopping by. Lynn
Delete